Step by Step: How to make glue from fish bladders
Part of the routine activities of conservators is to make our own tools and solutions for use in conservation treatment. Many traditional materials can be found on specialty websites andin stores, but some we just prefer to mix ourselves. Isinglass is a natural and refined glue made from gelatin from cooked down sturgeon bladders. It's optical properties, such as reversibility, aging characteristics, and strength, make it a very good choice of glue to be used in many conservation treatment applications. It is used mainly in consolidation (stabilization of flaking media), though also has applications in tear repair, facing, and as a general adhesive. I hope this blog post illustrates the care and time conservators put into selecting (and making) their materials, as well as the actual treatment of art.

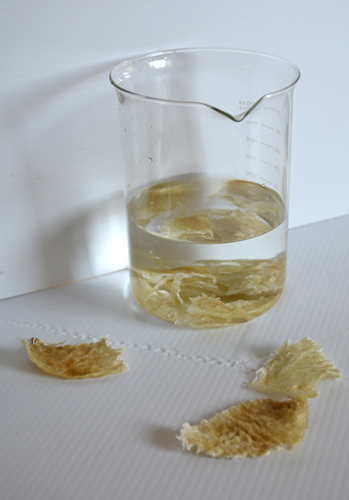
First, the swim bladders of the sturgeon are purchased dried and unprocessed. They should be free of blood clots and other large inclusions. For this project, I used 50 grams of dried Salianski bladders purchased from L. Cornelissen & Son.
The swim bladders should be soaked overnight in water using approximately a 1:10 glue-to-water ratio. I eye-balled the ratio in a large glass beaker to a final volume of about 800 ml. To help them absorb water, the bladders can be cut into smaller pieces. I found this time-consuming and difficult, so I ended up soaking them whole. After a period of 24 hours, the bladders should be spongy to the touch and able to be easily pulled apart.


Once the bladders are sufficiently spongy, they should be kneaded into a homogeneous blob. The texture was kind of doughy at this point, and obtaining the blob was easier than I thought. Any hard bits should be worked into the dough. If there are a few remaining, they will be filtered out at a later stage.
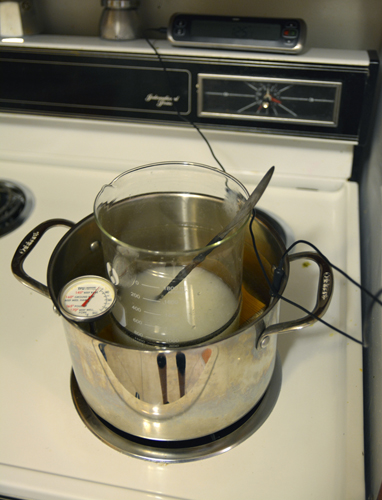
The glue and water were placed in a makeshift double boiler using the glass beaker, a wooden block, and a large cooking pot. The mixture should be cooked in hot water, never exceeding 140 degrees F (60 degrees C). I allowed the glass beaker to come to temperature in the water and kept a digital thermometer in the cooking water to monitor the water temperature. To double check, I also kept a meat thermometer inserted in the water and had a glass of cold water on hand to cool the water, if necessary. As the water began to reach temperature, the mixture became cloudy as the dough began to dissolve. The solution was stirred with regularity and after about 45 minutes, the glue was mostly in solution. I found that I had to get the outside water temperature very close to 140 for the majority of the mixture to dissolve. The water eventually became more clear as the dough melted. To see that all was well, I checked the tack of the glue as it neared completion, and the results were satisfactory.
After cooking, the solution was filtered into a large glass jar through a nylon stocking. The material remaining in the stocking should be squeezed through to help dissolve any remaining bits. This solution was then re-filtered using the same stocking. Bits remaining after the second filtration can be discarded with the stocking. At this point, the solution should be yellowish and clear of bits. I poured it onto a sheet of non-stick Mylar that had been previously prepared over a large table. Incidentally, I also had to prepare an additional sheet of Mylar to accommodate the large amount of glue produced. The glue should be left undisturbed to dry. To make more homogeneous and complete sheets, I attempted to spread the glue mid-drying with a piece of stiff Mylar with some success. I did end up getting areas of pooling that took longer to dry than others.


Once the sheet is sufficiently dried, they can be easily separated from the Mylar and cut up into smaller pieces to be stored for later use.


The cut up pieces can be stored in jars and re-dissolved in water as they are needed. Though lengthy, the preparation of the glue yielded enough dried glue to last for a few years. The product is very refined and sure to contain no additional additives, bulking agents, or colorants.
For the instruction on the preparation of isinglass, I would like to give credit to my graduate painting conservation professor James Hamm at Buffalo State College and to Jill Whitten and Rob Proctor.
The final product